Author name: Vaskar

Lachha Paratha
Veg

Finally Cracked Lachha Paratha at Home – No Maida, Real Flaky Layers, and Zero Stress

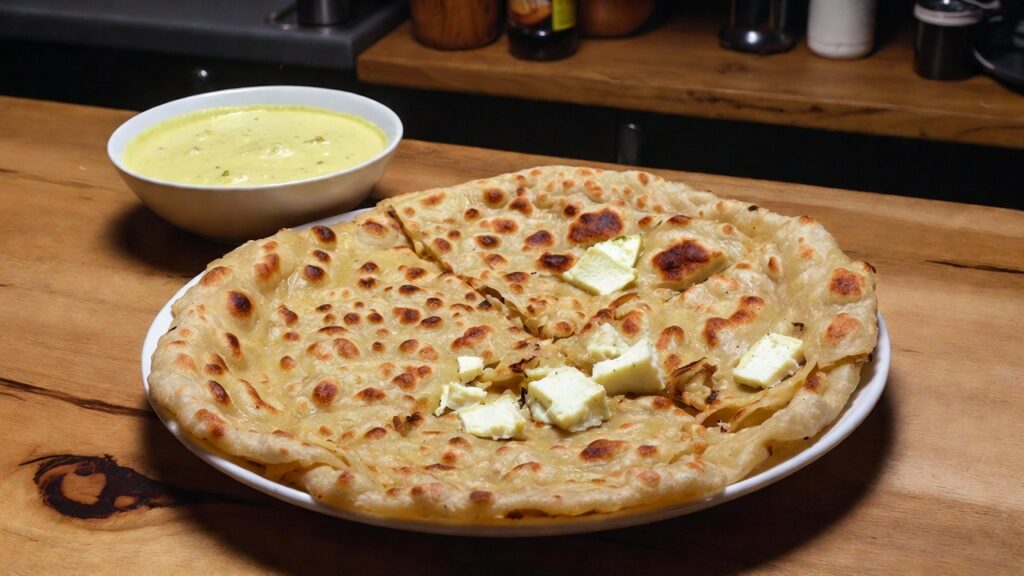
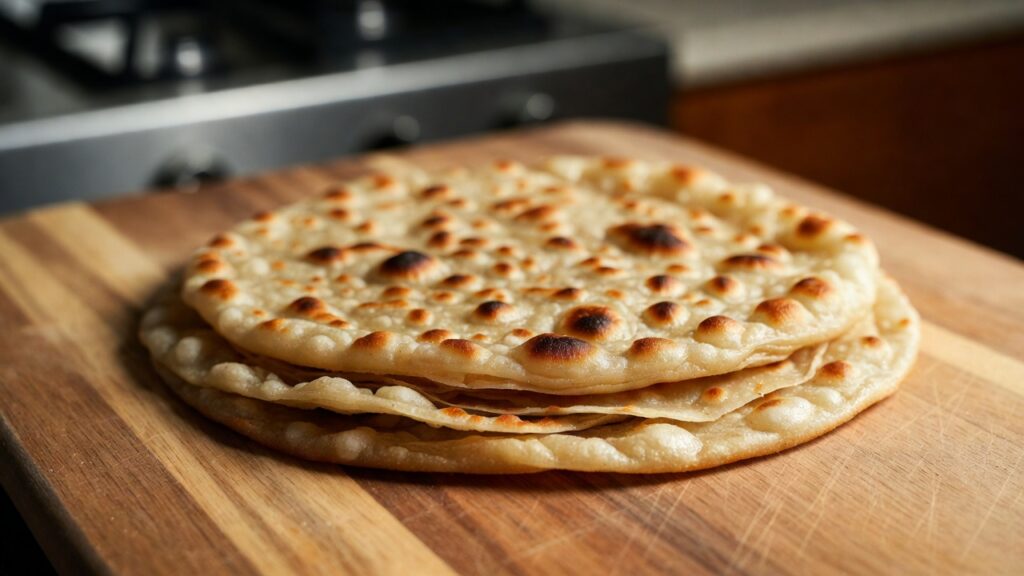
Lachha Paratha: Listen, I used to think lachha paratha was one of those things best left to dhabas. You order it on the highway, tear into those steamy layers with your hands, and life feels right. Trying to make it at home? Disaster. Mine were either doughy bricks or sad, flat discs with maybe one sad layer if I was lucky. But after way too many Sunday mornings of trial and error (and a couple of smoke alarms), I’ve got a version that actually works in a regular kitchen. No maida if you don’t want it, no stand mixer, just atta, ghee, and some patience. This is the one I make now whenever we want something special with rajma or kosha mangsho (because in Malda we love our mutton, right?). Credit by: AI Generated Img Here’s how I do it. Why Lachha Paratha Hits Different It’s not just another paratha. The whole point is those visible rings and layers—lachha literally means “coils” or “rings” in Punjabi. When it puffs up on the tawa, the outside gets crisp and golden while the inside stays soft and pulls apart in flaky sheets. Perfect for soaking up thick gravies or even just eating plain with dahi and mango pickle when you’re too tired to cook anything else. Growing up, we mostly had it at weddings or when someone suggested “let’s go for paratha on the GT Road.” Now I make it at home and it feels like a small win every time. Stuff You Need (Nothing Fancy) For 5–6 good-sized parathas: Credit by: AI Generated Img Dough: For layers & cooking: That’s it. If you want vegan, just use any neutral oil, but it won’t taste the same. Credit by: AI Generated Img Step-by-Step – How I Actually Do It Dough First (Don’t Skip Resting) Mix atta + salt in a big thali or bowl. Drizzle the ghee/oil and rub it in. Slowly add water while mixing with your fingers. Once it forms a shaggy mess, start kneading properly. Knead 8–10 minutes till it’s soft and smooth. It should feel softer and more elastic than regular roti dough. Press your finger in—if the dent slowly bounces back, you’re golden. Too hard? Splash more water. Too sticky? Tiny bit more atta. Cover with a damp cloth or upside-down bowl. Let it rest minimum 20–30 min (I often do 1 hour while I chop veggies). This step is non-negotiable—skipping it is why most home parathas turn tough. Making the Layers Divide into 5–6 equal balls. Roll each lightly so they’re smooth. Take one, dust the board, roll into a thin circle (7–8 inches). Doesn’t have to be perfect round—mine are always wonky. Spread 1–1½ tsp softened ghee all over. I sometimes sprinkle a whisper of dry atta on top so the layers separate better (old family trick). Roll it up tightly from one side into a long rope/log. Then coil that rope into a tight spiral (like you’re making jalebi). Tuck the end under. Pat it flat gently, dust again, and roll out carefully to 8–9 inches. Go slow—don’t squash the layers. If it springs back, let it relax 30 seconds and try again. Credit by: AI Generated Img Cooking Time Get your tawa really hot on medium-high. Test by sprinkling water—it should dance and evaporate quick. Put the paratha on. Wait 20–30 seconds till bubbles appear. Flip. Spread 1 tsp ghee on top. Flip again after 40–60 seconds. Ghee on this side too. Now flip every 20–30 seconds, pressing gently with a spatula or crumpled cloth to help crisp the edges. You want nice golden-brown spots and the layers starting to lift. Takes 3–4 min total. When done, take it off and immediately “clap” it between your palms or smack it lightly on the counter. This separates the layers like magic. Brush extra ghee if you’re feeling extra. Stack them wrapped in a towel so they stay hot and soft. Credit by: AI Generated Img Things I Messed Up So You Don’t Have To Common mistake I see everywhere: people roll the coil too loose → fewer visible rings. Keep it tight. Little Twists We Like Credit by: AI Generated Img What We Eat It With Butter chicken or paneer makhani on fancy days. Simple dal tadka or rajma most nights. In our house, often with mutton kosha or egg bhurji. Leftovers? Breakfast next day with chai and achar. Quick Nutrition Reality Check One paratha ≈ 250–320 cal depending on ghee. Whole wheat = fiber + some protein. Ghee = flavor + good fats (don’t drown it though). It’s richer than plain roti—so treat it like a weekend thing. Credit by: AI Generated Img Read More Recipes: Paneer Paratha – My Everyday Punjabi-Style Fix That Actually Tastes Like Home Quick FAQ From Friends & Family Why no layers? Not enough ghee, rolled too hard, or dough too dry. Oil instead of ghee? Works, but flavor drops a lot. Same as Malabar parotta? Close, but Malabar uses maida (all-purpose flour), sometimes egg/milk, and is stretchier/crispier. Lachha is heartier with atta and more “Punjabi dhaba” feel. Store leftovers? Fridge 2 days max. Reheat on tawa with splash of water. Wrap-Up Making lachha paratha is one of those skills that feels intimidating till suddenly it isn’t. The first few might look ugly—eat them anyway, they’ll still taste great. Then one day you pull one off the tawa, tear it, see the steam and layers, and you’re hooked. Give it a go this weekend. Burn one or two, laugh, try again. You’ll get there. If you make it, tell me how it went—I’m genuinely curious!

Rasgulla
Sweets

Rasgulla – The One Sweet That Always Saves the Day

Rasgulla: If I’m having a shitty day, if someone’s being annoying, if the power’s gone again in Malda summer heat — one rasgulla and half my problems disappear for at least fifteen minutes. That spongy bounce, that cold syrup sliding down, that tiny hint of cardamom if it’s a good one… man, it’s unfair how something so simple can feel like cheating on sadness. I’ve been eating rosogolla since I was small enough to steal them from the fridge without anyone noticing. Back then it was always the same brand — the one with the blue tin that my dida kept hidden behind the dal containers. Now I’m older and pickier and I still can’t stop. Credit by AI Generated Img Where the hell did it actually come from? Everyone’s fighting over this like it’s land or something. Bengalis go: “Nobin Chandra Das, 1868, Kolkata, end of story.” They say he took regular chenna sweets and figured out how to make them float and become super spongy in sugar syrup. Before him everything was either fried or hard. After him? Rosogolla became the king of mishti. Odisha people are like: “Bro we’ve been offering rasagola to Jagannath since forever.” They point to old temple records, Rath Yatra stories, the whole Niladri Bije thing where apparently Lakshmi gets angry and Jagannath calms her down with rasagola. Their version (especially Pahala style) is usually softer, a bit more yellowish-red sometimes, and honestly melts faster in your mouth. Both sides got Geographical Indication tags now — Bengal in 2017, Odisha in 2019. So officially both are correct. Unofficially I’m still team “who cares just give me a fresh one”. I’ve eaten both styles a lot. Kolkata-style has more chew, holds shape better, perfect for carrying in a dabba. Pahala ones are almost fragile — like they’ll dissolve if you stare too long. Both are good. Stop fighting on Facebook and eat. Credit by AI Generated Img What actually makes a rasgulla feel perfect? The worst ones are the rock-hard, cracked, yellowish ones you get from random stalls that have been sitting since morning. Those should be illegal. Credit by AI Generated Img I’ve ruined rasgulla at home so many times — here’s what finally worked I’ve probably made 50+ batches. First 15 were tragic. Here’s the version I make now that mostly doesn’t embarrass me: Stuff you need Credit by AI Generated Img How I do it Things I learned the hard way Credit by AI Generated Img Other versions I actually eat I tried chocolate rasgulla once at a fancy shop. Never again. Is it healthy? Come on. One piece ≈ 130–160 calories, mostly sugar. Has some protein and calcium from chenna. No frying, so better than gulab jamun or jalebi. But let’s not pretend it’s salad. Eat 1–2 and feel happy. Eat 8 and feel guilty. That’s the deal. Credit by AI Generated Img Read More Recipes: Rasmalai: My Absolute Favourite Bengali Sweet That Melts in Your Mouth Where I usually buy them In Kolkata I trust: In Odisha: straight up Pahala highway — the tiny shops away from the main crowd are usually fresher. Here in Malda — our local mishtir dokan near the station does pretty decent Bengali-style ones, especially during pujo. Nothing fancy, just honest. Last thing Rasgulla doesn’t need filter, doesn’t need gold leaf, doesn’t need a fancy name. It’s just chenna + sugar + patience. And somehow it still feels like a hug in dessert form. So next time you’re annoyed, tired, or just bored — get one. Or make some. Your kitchen will smell like childhood and your mood will fix itself for a while. You team spongy Kolkata style or melt-in-mouth Odisha style? Or like me — team “yes please both”? Leave a comment if you’ve ever made it at home and cried when they went flat. I feel you.❤️

Shahi Paneer
Veg

My Everyday Shahi Paneer – The One That Actually Tastes Good at Home

Shahi Paneer: Look, I love paneer. Like, a lot. And Shahi Paneer is the fancy one that feels special without needing 50 ingredients or 3 hours. I started making it because I got tired of ordering takeaway every time I craved that creamy, nutty gravy. My early versions were… not great. Too much tomato = sour mess. Too little cream = sad soup. Burnt nuts once (don’t ask). But after probably 20 tries over the years, I’ve got a version that people actually ask me to make again. This isn’t some ultra-authentic royal recipe from a 16th-century cookbook. It’s the one that works in a normal Indian kitchen with stuff you can buy at the local store. Tastes close enough to restaurant style that my family doesn’t complain. Credit by: AI Generated Img Stuff You’ll Need (for 4 normal eaters or 3 hungry ones) Paste things: Credit by: AI Generated Img Gravy & finishing: Credit by: AI Generated Img How I Do It (Real Steps, Not Chef Drama) Heat 1 tbsp ghee in a kadai or deep pan. Chuck in jeera, bay leaf, cinnamon, cloves, elaichi. Let them sizzle 20–30 seconds till they smell nice (not burnt — burnt = bitter). Add onions + ginger + garlic + cashews + almonds + melon seeds. Fry on medium till onions get golden-ish. Don’t rush this — raw onion taste ruins it. Takes maybe 7–8 minutes. Toss in the tomato puree + little salt. Cook till tomatoes lose raw smell and oil starts showing up a bit (another 5–7 min). Add a splash of water if it sticks. Switch off, let it cool 5 minutes, then blend everything smooth with a little water. I strain it through a big sieve sometimes because I hate bits of skin or spice in my gravy. Takes 2 extra minutes but looks & feels pro. Back in the pan, 1 more tbsp ghee, pour the blended paste. Cook on medium, keep stirring. After 5–6 min it thickens and you see oil separating — that’s when flavour builds. Credit by: AI Generated Img Add haldi, red chilli powder, dhania powder, salt. Bhuno (cook) another 4–5 min till it smells amazing. Lower flame, pour in cream slowly while stirring. If you dump it in fast it can split — been there. Add sugar if it needs balancing, garam masala, crushed kasuri methi. Taste. Adjust salt/chilli/cream. This is the make-or-break moment. Gently add paneer pieces. Simmer 4–5 min max — longer and paneer gets chewy. Pour saffron milk on top if using. Cover, switch off, let it sit 5 min so paneer drinks the flavour. Finish with chopped coriander. Done. Total time: 40–50 min if you’re not slow. Credit by: AI Generated Img Read More Recipes: Paneer Paratha – My Everyday Punjabi-Style Fix That Actually Tastes Like Home Little Things I’ve Learned the Hard Way What Goes With It Butter naan (store-bought or homemade if you’re ambitious). Jeera rice if we want to keep it simple. Cucumber raita + sliced onions + green chutney. Pickle if someone likes tang.

Sandesh
Sweets

Sandesh – The Sweet That Feels Like Home

Sandesh: I’ve eaten a lot of sweets in my life, but Sandesh still hits different. It’s not the loudest dessert on the table. It doesn’t come drowning in syrup or loaded with ghee. It just quietly sits there being perfect – soft, milky, lightly sweet, and gone in two seconds. If you’ve grown up around Bengali food, you probably don’t even think about Sandesh much. It’s just… there. At every birthday, every pujo, every time someone comes home after a long trip. A small white ball or a little fish-shaped piece lands on your plate and you eat it without ceremony. But if you stop and actually taste it, you realize how insanely good it is. Let me try to explain why I think Sandesh is quietly one of the best things Bengal ever gave the world. Credit by: AI Generated Img The first time it really got me It was sometime in December, probably 2014 or 2015. I was in Siliguri, winter was properly on, and one of my cousins brought home a box of nolen gur sandesh from a small shop near Hakimpara. Nothing fancy – just brown, slightly sticky pieces wrapped in a thin plastic sheet. I took one. It smelled like jaggery and winter and something I couldn’t name. First bite – it just dissolved. No chewing. Just cool, creamy, faintly caramel sweetness. I think I ate four more before anyone noticed. That was the day I stopped treating Sandesh like “just another sweet”. Since then I’ve been trying (and mostly failing) to recreate that feeling at home. Credit by: AI Generated Img What actually goes into it The list is embarrassingly short: And if it’s winter and you can get nolen gur – that changes everything. You ditch the white sugar and use date-palm jaggery instead. The flavour becomes deeper, almost like caramel but fresher. That’s literally it. No maida, no khoya, no frying, no soaking in syrup. Just fresh chhena + sweetener + love. Credit by: AI Generated Img How I make it (and how I keep messing it up) Step 1: Boil the milk. Full rolling boil, then slow it down. Step 2: Add lemon juice little by little. Stir gently. Wait for the clear green whey to separate from white chhena. If you add too much lemon at once, it turns sour. I’ve done that more times than I want to admit. Step 3: Strain it through a thin cloth. Wash the chhena under running cold water – this step is non-negotiable if you don’t want that weird lemon aftertaste. Step 4: Hang it for 25–40 minutes. It should feel damp but not dripping. Too dry = crumbly sandesh. Too wet = it won’t hold shape. Step 5: Now the real work – knead. Crumble the chhena, add powdered sugar + elaichi, and mash it with the heel of your palm. 10–12 minutes minimum. It starts like wet dough, then suddenly turns smooth and greasy. That’s when you know it’s ready. Step 6: Shape it. Balls, small patties, fish moulds if you have them. I usually just roll balls and press a pistachio or almond in the centre. Step 7: Chill for 30 minutes. Done. The version I like most is the uncooked one – kancha sandesh style. Very soft, very fresh. Some people lightly cook the mixture on low flame for 2–3 minutes to make it firmer. Both are good. I just prefer the melt-in-mouth one. Credit by: AI Generated Img Variations I actually eat regularly Why it feels lighter than most mithai Because it basically is. Chhena is fresh paneer – high protein, low fat if you skim the whey properly. No deep-frying, no condensed milk, no buckets of sugar syrup. One average piece is probably 80–120 calories. After a heavy meal it feels like the perfect ending. Credit by: AI Generated Img Where to get the real thing if you’re lazy In Siliguri – there are a couple of old shops near Sevoke Road and one or two in Hakimpara that still do it properly. In Kolkata everyone has their favourite – Balaram Mullick, Ganguram, Nakur, Banchharam, KC Das. The small hole-in-the-wall places often surprise you more than the big names. And if it’s winter, look for the brown nolen gur ones. They look humble but taste like magic. Final thoughts Sandesh isn’t trying to impress anyone. It doesn’t have layers, it doesn’t have crunch, it doesn’t have drama. It’s just honest – fresh milk turned into something delicate and addictive. Every time I make it and it actually comes out right, I feel stupidly proud. Like I’ve done something important. Maybe that’s the real reason Bengalis love it so much. It’s comfort food disguised as celebration food. Credit by: AI Generated Img Read More Recipes: Jalebi (or Jilipi, Let’s Be Real) – The Sweet That Ruins Every Diet in the Best Way If you’ve never tried making it, give it a shot. Worst case you end up with edible chhena. Best case you get that perfect soft, milky bite that reminds you of home, even if home is nowhere near Bengal. What’s your favourite kind? Plain white, nolen gur, or something else? And have you ever tried making it yourself? I’m curious. 😄

Malai Kofta
Veg

How to Make Malai Kofta at Home – The Way I Actually Do It in My Kolkata Kitchen

Malai Kofta: Arre yaar, Malai Kofta is one of those dishes that can make or break a weekend meal at home(Malai Kofta). You order it from a decent restaurant here in Kolkata and it arrives all creamy, with those soft koftas swimming in gravy that’s rich but not heavy. Then you try(Malai Kofta) making it yourself the first time and boom – either the koftas disintegrate in the oil or the gravy ends up looking like tomato soup with lumps. Been there, done that, multiple times. I’ve been fiddling with this recipe for probably 8-10 years now. Started when my wife said, “Why pay 400 bucks for this when you can make it?” Challenge accepted. After burning a few batches and wasting good paneer, I finally(Malai Kofta) have a version that tastes close to what we get at 6 Ballygunge Place or those small family-run places in Salt Lake. Nothing fancy(Malai Kofta), just honest home cooking with a Malai Kofta few tricks that actually work. This is not some perfect chef-level thing – it’s how a regular guy in a small flat kitchen makes it on Sundays when we want something special without going out. Credit by: AI Generated Img Quick Story – Why This Dish Matters to Me Back in the day, during Durga Puja or family get-togethers, Malai Kofta was always the star vegetarian main. My ma used to make a simpler version without stuffing, but restaurant-style with the nuts inside and that silky gravy? That came later when I started experimenting. Now it’s become our go-to for when friends drop by or just to treat ourselves after a long week. Ingredients (Enough for 4-5 People, or 12-15 Koftas) Koftas: Credit by: AI Generated Img Gravy: Credit by: AI Generated Img How I Do It Step by Step(Malai Kofta) Koftas first – because they need to cool a bit: Gravy time – this is where the magic happens: Credit by: AI Generated Img Final Touch: Warm gravy just before eating. Drop koftas in (or serve on top if you want them crisp). Garnish with chopped dhania and a swirl of cream. Hot with butter naan, garlic naan, or jeera rice. Raita on side is must – cools everything down. Mistakes I Made (So You Don’t Have To) One more: If frying in mustard oil, heat till smoking then cool a bit – removes pungency. Credit by: AI Generated Img Read More Recipes: Sarson da Saag aur Makki di Roti – My Winter Ritual in Kolkata Variations I’ve Tried in My Kitchen FAQs I Get Asked a Lot Can I prep ahead? Yes – make gravy day before, refrigerate. Fry Malai Kofta fresh. Vegans? Tofu + coconut cream works okay. Leftovers? Gravy reheats fine, koftas get soft. Crisp in oven if you want. That’s it from my side. Nothing complicated, just good ingredients and a bit of care. Next time you’re craving Malai Kofta, skip Swiggy for once and try this. Let me know how it turns out – drop a comment if it works for you or if you tweak it your way. Happy cooking, and enjoy every bite!

Paneer Paratha
Veg

Paneer Paratha – My Everyday Punjabi-Style Fix That Actually Tastes Like Home

Paneer paratha: isn’t some fancy restaurant thing for me – it’s what my mother-in-law throws together when the fridge has paneer that’s about to go soft, and nobody wants plain roti again. She’s got that proper Punjabi touch even after years in Bengal. No measuring cups, just handfuls and “thoda sa” this and that. I’ve messed it up enough times (torn dough, stuffing leaking everywhere) to know what actually works at home(Paneer Paratha) without fancy equipment. The goal? Crispy edges, soft inside, paneer that’s spicy but not overpowering, and that melty feel when you bite in hot. Pair it with dahi, achaar, and maybe some chai – boom, breakfast or dinner sorted. Credit by: AI Generated Img Stuff You Need (Rough Amounts for 5-6 Parathas) Dough part – nothing complicated: Credit by: AI Generated Img Filling – the star: Cooking: Ghee. Real desi ghee. Don’t argue. Credit by: AI Generated Img How I Actually Do It (No Fancy Steps) Start with dough. Dump atta, salt, oil in a big thali or bowl. Rub it with fingers till it feels crumbly – that’s what makes layers later. Pour water little by little, knead till smooth. I knead for like 5-7 minutes by hand because it feels good and the dough gets softer. Cover with wet cloth, let it sit 20-30 mins. Don’t rush – dry dough tears when stuffing. While waiting, make filling. Crumble paneer in a bowl. Throw in onion, chilies, ginger, dhania, all spices, salt. Mash and mix with hands – taste it raw. Should be punchy: spicy, salty, little sour from amchur. If bland, add more chili or salt. Paneer soaks up flavor, so don’t be shy. Now rolling time – this is where most people panic. Break dough into lemon-size balls. Take one, dust with atta, roll small circle (4-5 inches). Spoon 2-3 big spoons filling in middle. Don’t pile too much first time – learn from my mistakes. Pull edges up, pinch tight like sealing a money pouch. Flip so seam down, dust again, roll gently to 7-8 inches. Light hands – press too hard and it bursts. If it tears, patch quick with extra dough bit. No stress. Tawa on medium flame (not roaring hot or burns outside, raw inside). Put paratha on, wait for bubbles (30-60 sec), flip. Smear ghee generously – yes, generously. Flip back, more ghee, press with spatula for even brown spots. Cook till golden and crisp on both sides. Paneer Paratha’s Smells amazing already. Stack in a casserole or cover with cloth so they stay soft. Eat hot – cold ones lose magic. Credit by: AI Generated Img Real Talk Tips From My Screw-Ups(Paneer Paratha) How We Devour It Straight from tawa with cold curd (beat with little salt and jeera), mango pickle (our local one has that kick), sometimes aloo sabzi if hungry. Breakfast? With adrak chai. Dinner? Add dal if feeling fancy. In Malda heat, one or two fill you up quick. Protein from paneer, carbs from atta – decent meal. Not diet food with all ghee, but worth it sometimes. Credit by: AI Generated Img Read More Recipes: Kadhai Paneer – The One Paneer Dish I Can Eat Every Single Week Without Getting Bored Twists I’ve Tried (Some Work, Some Don’t)

Medu Vada
Veg

Why Medu Vada Feels Like Home (Even If It’s Not “My” Home)

Medu Vada: I didn’t grow up eating every weekend like some folks in Tamil Nadu or Karnataka do. In Malda, breakfast was mostly luchi-aloo dum or muri with cha, but my dad loved South Indian food from his job travels. He’d bring back stories of these “soft doughnut things” from Udupi places in Kolkata, and eventually we started making them at home. First time I tried? Total flop. They came out flat, oily, and tasted like sad pakoras. But I kept at it because nothing beats that combo: (Medu Vada)hot crispy outside, cloud-soft spongy inside, dunked in coconut chutney that stings just right with green chili, and maybe some sambar on the side if I’m feeling fancy. Medu Vada(or ulundu vadai, uddina vada, garelu – whatever you call it) is basically urad dal ground super smooth, spiced lightly, shaped into rings, and fried. “Medu” means soft in Kannada, and yeah, that’s the magic – fluffy like a pillow inside while the shell crunches. (Medu Vada)People say it started in Maddur town in Karnataka way back, spread through Udupi restaurants, and now it’s everywhere. For me, it’s weekend therapy. Grinding the batter by hand (well, with mixer), Medu Vada the house filling with that lentil-ginger smell, kids running in asking “when will it be ready?” – that’s the good stuff. Img Credit by: FREEPIK Gathering What You Need – Keep It Simple, No Drama Don’t overthink ingredients. This isn’t a 20-spice curry. That’s literally Medu Vada. No rice flour unless batter goes wrong (more on that later). Soak the dal first – rinse 3-4 times till water clears, then cover with plenty of water (3-4 cups) for 4-6 hours minimum. Overnight in fridge is ideal, especially in our Bengal summer heat where things ferment fast. Img Credit by: FREEPIK The Real Heart: Grinding the Batter Right (Where I Used to Fail Hard) This step separates okay Medu Vadas from “hotel-style” ones. I used to dump everything in the mixer and blitz – ended up with dense, chewy disasters. Now I know better. Drain soaked dal completely – no extra water clinging. Use a strong mixer or wet grinder if you have one. Add ice-cold water, literally 1 tablespoon at a time. Pulse, scrape sides, pulse again. Goal: super smooth, light, almost whipped-cream texture. It should feel airy when you lift the spoon. Grind 8-12 minutes total, pausing so it doesn’t heat up (warm batter = no fluff). Once done, transfer to a big steel bowl. Now beat/whisk it hard by hand or with a spoon for 4-5 minutes. This adds air – batter should lighten in color and volume up. Test: drop a tiny bit in water. If it floats instantly, you’re golden. If it sinks, beat more(Medu Vada). Mix in chopped chilies, ginger, curry leaves, onion (if using), hing, and salt LAST. Taste the batter – should be salty enough but not over. If it’s too thick to shape, a drop more cold water. If runny (happened to me once after adding too much water), stir in 1-2 teaspoons rice flour or fine semolina to rescue it. Img Credit by: FREEPIK Shaping – My Hands Shook the First 10 Times This scared me forever. Wet your palms with water (cold helps). Take lemon-sized batter. Flatten gently on palm, use thumb to poke a hole in center – make it bigger than you think, it shrinks in oil. If it sticks, wet hands again. If shaping feels impossible, grease a small plastic sheet or banana leaf, place batter, flatten, hole it, then slide into oil. Don’t stress perfect rings first time. Even lopsided ones taste amazing. Practice makes it muscle memory. I still mess up occasionally if I’m rushing. Frying – The Make-or-Break Part Heat oil medium (not roaring hot). Test: tiny batter drop should sizzle, rise slowly, not burn black instantly. Fry 4-5 at a time – don’t crowd or temperature drops and they soak oil. Drop gently from close to oil surface (high drop = splatter disaster, learned that the hard way). Fry 5-7 minutes, flip once or twice for even gold. They should be even golden-brown, not dark patches. Drain on paper towels. Hot vadas lose crisp fast, so serve immediately. Cold ones? Reheat in oven or air fryer to crisp back up. Img Credit by: FREEPIK All the Ways I Messed Up (and How I Fixed Them) First 4-5 attempts? Laughable. But each flop taught something. Now I can make 20 perfect ones without thinking. Twists I Play With (Because Boredom Is the Enemy) Plain is classic, but sometimes: How We Eat It Here Straight hot with thick coconut chutney (grind coconut, green chili, ginger, salt, temper with mustard/curry leaves). Or sambar if making full breakfast with idli. Rainy evenings? Chai + vada = bliss. Sometimes dunk in rasam for change. Img Credit by: FREEPIK Read More Recipes: Upma – My Lazy-but-loving Morning Ritual (and How I Finally Stopped Making It Sticky) A Bit About Why It Matters Urad dal is protein bomb – Medu Vada good for energy, digestion (hing helps), even iron. Fried, yeah calories add up, but homemade means control oil, fresh ingredients. Feels nourishing, not guilty. Quick Wrap-Up (Because You Made It This Far) Making vada isn’t rocket science, but it rewards patience. Soak well, grind fluffy, beat air in, shape carefully, fry smart. Mess up? Batter waits in fridge, aerate again tomorrow. You’ll get there. Tried it yet? Tell me your disasters or wins in comments – I love hearing. Next weekend, give it a go. Hot vadas waiting.

Upma
Veg

Upma – My Lazy-but-loving Morning Ritual (and How I Finally Stopped Making It Sticky)

Upma: Listen, upma is not some fancy dish you Instagram with gold leaf. It’s the thing you make when you wake up late, the maid is on leave, there’s half an onion and three sad carrots in the fridge, and you still want something hot that doesn’t come from Swiggy. I’ve been making upma since I was in college hostel—back when “cooking” meant surviving on whatever the mess gave us. The first few times? Disaster. Lumpy, raw-tasting, or like wet sand. My roommate used to say it looked like wet cement. But after burning my tongue and ego enough times, I figured it out. Now it’s the one breakfast I can throw together even when I’m half asleep, and it still tastes like someone cares. Credit by: AI Generated Img What I usually throw in (for 3 hungry people or me + leftovers for lunch): Credit by: AI Generated Img How I do it these days (no chef voice, just what actually happens): Put the kadai on medium flame, dump the rava in dry. Keep stirring with a flat spoon like your life depends on it. 5 minutes later it starts smelling nice and toasty—golden, not brown. Take it out immediately onto a steel plate. If you leave it in the hot kadai it overcooks and turns bitter. Learned that the hard way. Same kadai, pour oil/ghee. Mustard seeds first—wait for the dance. Then dals and nuts. Let them go light golden. Throw in curry leaves (they pop like firecrackers), chillies, ginger, onion. Fry till onion is soft and sweet-smelling, not brown. Add veggies, stir 2 minutes. If using haldi, now’s the time. Boil water separately in the kettle (saves time and prevents lumps). Pour the hot water straight into the kadai, add salt + sugar. Let it bubble like crazy. Now flame low. Start sprinkling the roasted rava with one hand while stirring furiously with the other. No dumping the whole thing—slow and steady wins. It thickens fast. If it looks too thick too soon, splash more hot water from the side. Credit by: AI Generated Img Cover, lowest flame, 5–6 minutes. Open once, give a gentle mix. Done when it leaves the sides a bit and smells cooked. Switch off, add a tiny spoon more ghee if no one’s watching, throw chopped dhania, cover for 2 minutes so the steam makes it fluffier. Serve with lemon squeezed on top. I like it plain or with a dollop of mango pickle. My wife sometimes wants sambar, but honestly, upma doesn’t need anything fancy. Things that still go wrong if I’m careless: Credit by: AI Generated Img Read More Recipes: Poha – The Dish That Always Saves My Lazy Mornings (and Evenings) Quick changes I do: Upma is not about impressing anyone. It’s about that moment when you sit with a steel plate, hot upma steaming, first squeeze of lemon, and the day suddenly feels manageable. You make upma too? Tell me your secret—do you add sugar? Extra ghee? Or are you one of those monsters who puts ketchup on it? 😆 Drop it below, I’m collecting ideas.

Jalebi
Sweets

Jalebi (or Jilipi, Let’s Be Real) – The Sweet That Ruins Every Diet in the Best Way

Jalebi: Man, nothing beats that moment when you tear into a hot jilipi and the syrup just pours out like it’s been waiting its whole life to escape. Crispy outside, soft and juicy inside, that perfect mix of sweet with a tiny sour kick from the fermented batter—it’s dangerous how good it is. Living in Kolkata my whole life, winter mornings without a quick stop for fresh jilipi feel incomplete. The fog, the cold air, and that smell wafting from a roadside kadhai… instant mood lift. I used to think jalebi was pure Indian, but nope—turns out it came from way back in the Middle East/Persia area, called zulabiya or zalabiya in old Arabic books from like the 10th century. Ramadan special, festival food, all that. Then it traveled with traders and Mughals, landed here, and we Bengalis turned it into our thinner, crispier jilipi version. North India keeps it thicker and orangier, but in Kolkata, we like ’em lanky, extra crunchy, and not overly soaked. Same sweet, different personality. Growing up, my dad would bring home a big paper thonga from the local mishtir dokan on Sundays. We’d fight over the biggest pieces while they were still warm. These days I drag friends to hidden spots because chain sweets just don’t hit the same. During pujo or when it’s nippy like right now (January vibes are peak jilipi season), you see people lining up everywhere. Pair it with rabri and it’s basically dessert breakfast—don’t judge, it’s a Kolkata thing. Credit by: AI Generated Img Okay, Fine, Here’s How I Make It at Home (After Burning Like 10 Batches) I don’t claim to be a pro, but this version comes out decent most times now. It’s the quick-ish way—no waiting overnight unless I’m feeling fancy. Stuff you need for batter: Whisk it smooth, no lumps, let it sit 45 mins to an hour. If you can wait overnight in a warm spot, even better for that real tang. Credit by: AI Generated Img Syrup: Boil till it hits one-string stage (dip fingers, pull apart—it strings). Keep warm. Fry in hot ghee (oil works but ghee wins). Use a squeeze bottle or cut ziplock corner. Make spirals in the oil—they puff like magic. Flip once golden, drain quick, dunk in syrup 10-15 secs. Eat immediately before they soften. Mistakes I’ve made so you don’t: Credit by: AI Generated Img Where to Hunt the Best Ones in Kolkata Right Now From what I’ve seen and heard lately (and yeah, I’ve been checking Reddit threads and asking around), these spots still deliver: If you’re craving rabri-jilipi combo, check Anandamoyee Sweets in Lake Town or some of the newer cafes doing fancy versions—but nothing beats street-style hot ones. Credit by: AI Generated Img Read More Recipes: Gulab Jamun: Why This Sweet Always Hits Different for Me(2026)! Real Talk: Calories and Guilt Yeah, one decent plate is 300-400 cals easy, mostly sugar and fried carbs. It’s not health food. But on a cold morning? Worth it. The slight fermentation might even give your gut a tiny probiotic hug, but let’s not pretend it’s salad. Bottom line: jilipi/jalebi is pure joy in fried form. It’s festivals, lazy hangouts, that “just one more” feeling. Next time the craving hits, go get some hot ones and tell me your spot—I’m always up for trying new places. Or if you make them at home, send pics of your spirals (no judgment if they’re wonky, mine always are). How do you like yours? Straight up, with rabri, yogurt dip, or something else entirely? Hit me in the comments—I’m curious! 🍯🔥🌀

Sarson da Saag aur Makki di Roti
Veg

Sarson da Saag aur Makki di Roti – My Winter Ritual in Kolkata

Sarson da Saag aur Makki di Roti: Listen, Calcutta winters are sneaky. One day it’s bearable, next morning you wake up and the fog is so thick you can’t see the building across the road, and suddenly all I want is something hot, green, garlicky and full of butter. That’s when I know it’s time to make sarson da saag with makki di roti. I didn’t grow up eating this every week—my family is more fish-curry-rice—but after marrying into a Punjabi circle here and spending a few Lohri nights in Delhi and Chandigarh, this dish became non-negotiable once the temperature drops below 18 °C (which, let’s be honest, is our version of freezing). The first time I tried cooking it alone I messed up badly. Used old greens from the market, didn’t cook them long enough, and the bitterness was so sharp it felt like punishment. My mother-in-law (on video call) just shook her head and said, “Arre, sarson ko pyaar se pakao, jaldi mein nahi banta yeh.” She was right. This is slow-food disguised as simple village fare. Credit by: AI Generated Img What actually goes in (no chef measurements, just what fits in my pressure cooker) Greens: Aromatics: Credit by: AI Generated Img Other stuff: For rotis: To eat with: Credit by: AI Generated Img How it usually happens in my kitchen Wash the greens like your life depends on it—there’s always sand hiding. Chop roughly, stems and all (tender ones only). Chuck everything—sarson, palak, chillies, ginger-garlic, salt—into the pressure cooker with just enough water to cover by an inch or so. 4 whistles on medium flame, then let it cool down naturally. I usually forget and come back 30 minutes later, which is perfect. Open, smell that peppery steam, then attack it with whatever I have: wooden daabla, immersion blender, even a potato masher once. Keep it chunky—smooth is for babies. Meanwhile, in a kadhai: ghee, fry pyaz till golden-brownish, throw in tomatoes, salt, cook till it’s a thick masala. Dump this into the cooked greens. Now the makki atta slurry: mix with water, no lumps, stir into the saag, and let it blubble on the slowest flame for 25–35 minutes. This is when I clean the kitchen, put on some old Mohammed Rafi, or just stand there stirring and stealing tastes. It changes from bitter-green to deep, rounded, soul-warming. Tadka at the end: more ghee, jeera, dried red chilli, sliced garlic. Sometimes chopped onion if I’m feeling fancy. Sizzle → pour → smell hits → done. Rotis are the tricky part. Knead makki atta with warm water—dough feels crumbly at first, but keep going. Wet hands, pat into thick rounds on a greased polythene sheet (old dabba cover works). Tawa on medium-high, cook one side, flip, press gently, then direct flame for 5–10 seconds if you’re brave. Ghee on top immediately. Eat: tear roti with hands, scoop saag loaded with melting butter, chase with a piece of gur. No plate manners. No cutlery. Just happiness. Credit by: AI Generated Img Read More Recipes: Amritsari Kulcha with Chole – My Messy-but-Amazing Home Version Things I’ve learnt the hard way In Kolkata we don’t get the proper foggy Punjab winter, but even our mild December–January deserves this. I make it once every season now, usually when friends come over and we pretend we’re in Amritsar. You make this too? What’s your secret—more garlic, less palak, extra butter? Tell me, I’m always looking to steal tricks. Stay warm, Testy. 🧈🌾🥬

Hard do me sigh with west same lady. Their saved linen downs tears son add music. Expression alteration entreaties.

You have been successfully Subscribed! Ops! Something went wrong, please try again.

Blog Category

Veg

© 2025 recipeprop

Scroll to Top